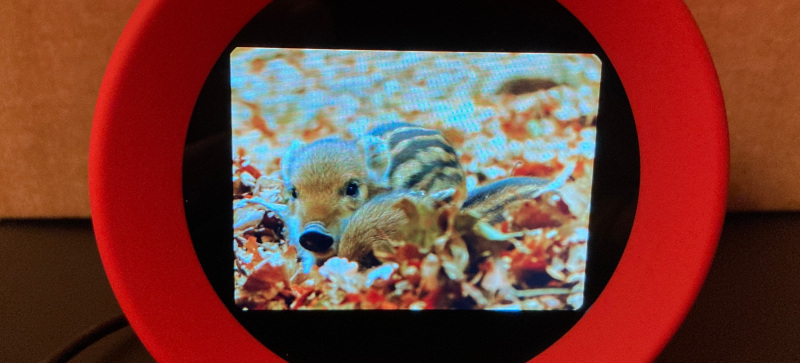
Putting a piglet picture on my Alarmo

Problem statement
When I heard about Gary’s Nintendo Alarmo hack, I had to have one1, too.
99.90 CHF and a week of waiting later, I could get to work.
This is (hopefully) a relatively thorough description of the journey from start to a piglet picture2.
Road to piglet
The process is relatively simple, consisting of only 3 steps:
- Getting the keys to the kingdom
- Injecting payload over USB
- Profit!
Let’s a go.
Getting the keys to the kingdom
In order to be able to run an arbitrary payload, it needs to be encrypted by a 128 bit key3.
So the first step is getting the key.
Gary in his article explains how:
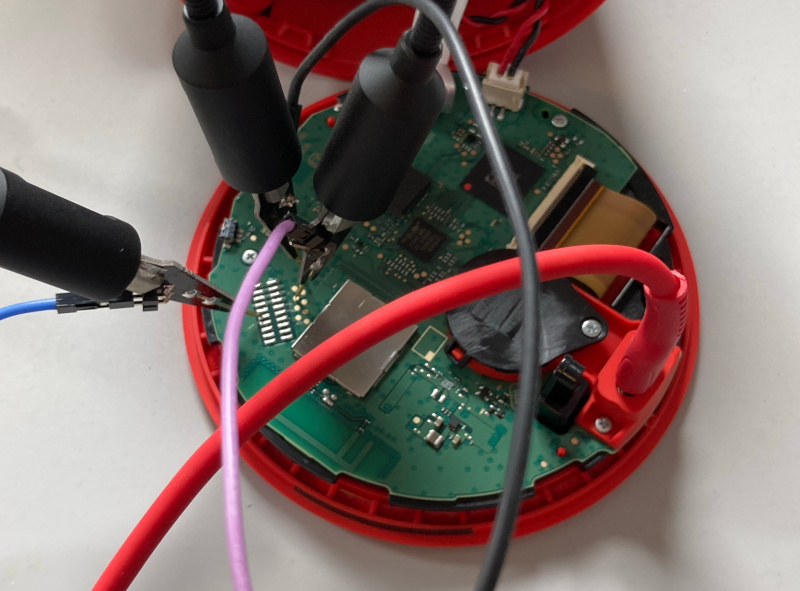
First, you remove the screw close to the USB-C port4, and gently twist the screen bezel to get in.
Then, attach SWD debugger (in my case ST-Link v25) to the right pins6:

The right pins can be found all over twitter. I liked the picture from @timschuerewegen because it shows which testpoints you can use (backup) – and the testpoints are much easier to solder to, if you need that.
With the testpoints connected to SWCLK, SWDIO, and GND (and power
still flowing via the USB-C), it’s time to openocd the hell out of this.
Here’s roughly what I’ve done:
$ git clone https://github.com/GaryOderNichts/alarmo
$ cd alarmo/key_bruteforcer/
$ make
[...]
$ openocd -f interface/stlink.cfg -f target/stm32h7x.cfg
Open On-Chip Debugger 0.12.0
Licensed under GNU GPL v2
For bug reports, read
        http://openocd.org/doc/doxygen/bugs.html
Info : auto-selecting first available session transport "hla_swd". \
	To override use 'transport select <transport>'.
Info : The selected transport took over low-level target control. \
	The results might differ compared to plain JTAG/SWD
Info : Listening on port 6666 for tcl connections
Info : Listening on port 4444 for telnet connections
Info : clock speed 1800 kHz
Info : STLINK V2J29S7 (API v2) VID:PID 0483:3748
Info : Target voltage: 3.269241
Info : [stm32h7x.cpu0] Cortex-M7 r1p2 processor detected
Info : [stm32h7x.cpu0] target has 8 breakpoints, 4 watchpoints
Info : starting gdb server for stm32h7x.cpu0 on 3333
Info : Listening on port 3333 for gdb connections
[...]
With that underway, in a second shell (from the same directory):
$ telnet 0 4444
Trying 0.0.0.0...
Connected to 0.
Escape character is '^]'.
Open On-Chip Debugger
> halt
[stm32h7x.cpu0] halted due to debug-request, current mode: Thread
xPSR: 0x21000000 pc: 0x7004e95e psp: 0x200117f0
> load_image payload.elf
228 bytes written at address 0x20000000
downloaded 228 bytes in 0.002641s (84.308 KiB/s)

> resume 0x20000000
[stm32h7x.cpu0] halted due to breakpoint, current mode: Thread
xPSR: 0x21000000 pc: 0x200000ca psp: 0x200117a8
> dump_image aes_data.bin 0x24000000 0x50
dumped 80 bytes in 0.001181s (66.152 KiB/s)

> exit
Connection closed by foreign host.
End result of which is the aes_data.bin file you can use to crack the key:
$ ./bruteforcer aes_data.bin
Bruteforcing key part 1 / 4... **.3% (0x****0000 / 0xffffffff)
Found key part 1 / 4: ********
Bruteforcing key part 2 / 4... **.0% (0x****0000 / 0xffffffff)
Found key part 2 / 4: ********
Bruteforcing key part 3 / 4... **.0% (0x****0000 / 0xffffffff)
Found key part 3 / 4: ********
Bruteforcing key part 4 / 4... __.7% (0x****0000 / 0xffffffff)
Found key part 4 / 4: ********
Found key! Took 398 seconds.
Key:    ********************************
IV:     ************************00000000
(obviously the real values are censored, and I ain’t sharing7)
Injecting payload over USB
Again, thanks to Gary & co, running an arbitrary payload is super easy, barely an inconvenience.
From the same repo, you can get your very own cat picture by simply doing:
$ cd ../
$ pwd
/home/wejn/[...]/alarmo
$ git submodule update --init --recursive
[...]
$ cd usb_payload/
Now, you need the Key and IV from the bruteforcer output above,
in order to create the right key.py:
cat - >key.py  <<'EOF'
AES_KEY = bytes.fromhex('********************************')
AES_IV = bytes.fromhex('************************')
EOF
(Note how the IV is shorter by 4 bytes than compared to the key)
Then, theoretically, all you need is make. For me, the problem was:
$ make
[...]
encrypting ... a.bin
Traceback (most recent call last):
  File "/home/wejn/[...]/alarmo/usb_payload/ciphtool.py", line 6, in <module>
    from Crypto.Cipher import AES
ModuleNotFoundError: No module named 'Crypto'
[...]
A while later, I figured out that for some reason, on my system (Devuan) one needs a small tweak to get to the finish line:
$ sed -i 's,Crypto.Cipher,Cryptodome.Cipher,' ciphtool.py
$ make
encrypting ... a.bin
With that, the three finger salute8, I could get a cat on the display.
But… I want a piglet!
Getting a custom payload made
Don’t let the presence of cat.png fool ya. The princess is in another castle.
It’s actually in source/cat.inc:
$ head -n 3 source/cat.inc |sed -r 's/(.{1,60}).*/\1/'
static const uint8_t image_data[] = {
0x3b, 0x39, 0x36, 0x2d, 0x2a, 0x26, 0x2c, 0x29, 0x25, 0x2a,
0x3b, 0x38, 0x36, 0x2f, 0x2c, 0x28, 0x2f, 0x2b, 0x27, 0x2c,
Now, if you dig into the format, it’s actually raw BGR pixels
of an image rotated by -90°.
So nothing we can’t fix. Given 320x240 input image, the following
img2inc.rb script will get you where you wanna go:
#!/usr/bin/env ruby

img_raw = `convert cat.png -rotate -90 rgb:-`
img = []
img_raw.bytes.each_slice(3) { |e| img << e.reverse }
img.flatten!

puts "static const uint8_t image_data[] = {"
img.each_slice(80/6) { |e|
  puts(e.map { |x| "0x%02x," % x.ord }.join(" "))
}
puts "};"
So given my own cat.png:
 a beloved pic of mine from Gabor Vereb
one shell invocation:
$ ruby img2inc.rb > source/cat.inc
$ make
main.c
linking ... usb_payload.elf
creating ... usb_payload.bin
encrypting ... a.bin
the three finger salute together with:
$ mount /media/sda1
$ cp a.bin /media/sda1
$ sync
$ cp MarkFile /media/sda1
$ umount /media/sda1
and a bit of waiting… gets you to the beauty showcased at the top of the post:

Closing words
You might be wondering why I’m simply walking through someone’s hard work without adding much of my own9.
To be honest, it’s not every day that I get to pull out ST-Link and run
openocd on a target.
And Gary’s article glossed over a bunch of cute little details that might not be immediately obvious (they weren’t to me).
So, next time I’m passing through these woods, I’d like to have a map. This map.
Now, if you’ll excuse me, I have a piglet picture to admire. And some C code to read.
-
No, not just an Alarmo clock. A hacked Alarmo clock. Duh. ↩
-
Which is obviously just the start of all the more interesting things one can do with it. Doom, etc. ↩
-
Akhschually, it was also supposed to be authenticated via an RSA signature on the binary, too, but Nintendo somehow kept that door unlocked. Thanks, Ninjas! ↩
-
Gary says phillips, mine was tri-wing #0. Oh well. ↩
-
All over AliExpress, for $2 or something. You can also use pico-probe, flipper, or any other fancy SWD debugger. ↩
-
Having a pcbite set is of great help. But soldering would work equally well. ↩
-
And if you can’t be bothered to do these few basic steps, maybe you shouldn’t be trying to run a custom payload on a hardware you own, yes? ↩
-
Press all three buttons on the Alarmo, and then plug the power in. ↩
-
I mean, the Ruby script might be worth something to someone, but it’s hardly revolutionary. ↩