Adding a layer indicator light to Svalboard
Problem statement
Ever since I started using my Svalboard, I was uneasy with the lack of a layer indicator. I might be an odd duck, but it feels important.
So one day… I decided to hack it.
If you only care about the end result, you know what to do.
Steps
I briefly spoke with Morgan1 and it turns out that there is an existing RGB led on the Svalboard board. Trouble is, it’s a normal 4-pin RGB LED and it is connected directly to Raspberry Pico’s GPIO pin. But Pico can’t really provide much current, so the solution desperately needs a mosfet (per color channel) to be fully operational.
Plan B —
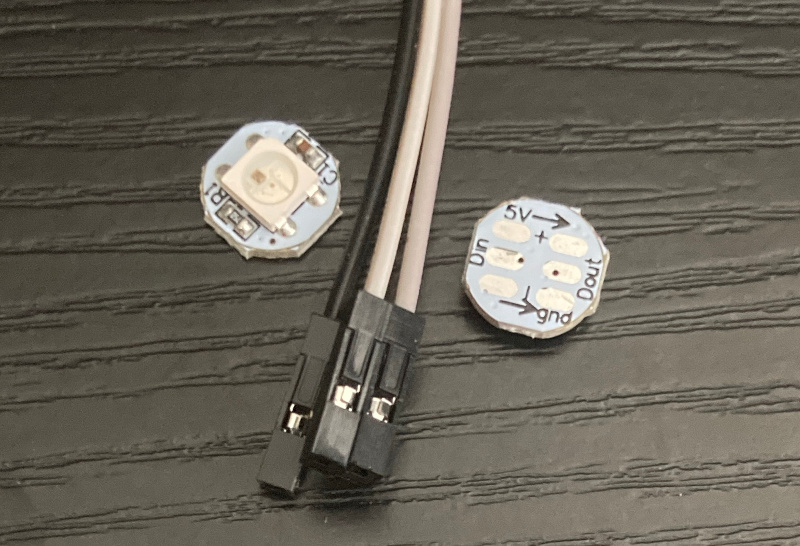
Since I have plenty of single WS2812 LEDs on a dev board:
 ws2812 on a proto board (both sides), as well as a sacrificial hook-up wire
It shouldn’t be very difficult to put them to good use.
Let’s find out:
Wiring
I asked Morgan2 for a free pin on the board, and was told that there’s plenty.
So in the end I called a committee meeting to discuss the issue at hand, and after
3 hours… GPIO163 ended up being the pin of choice.
To hook the badboy up, it needs three wires:
GNDVDD– typically 5V4DIN– data in
The fourth pin (DOUT) is for daisy-chaining more WS2812. I’m not that fancy.
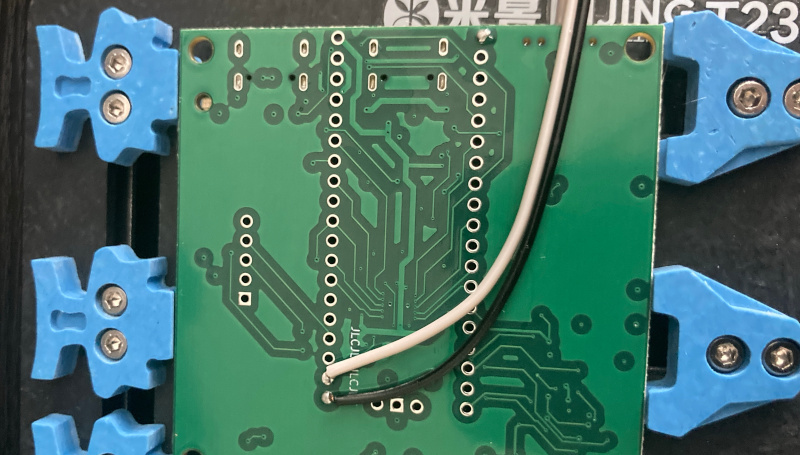
Anyway, a couple minutes later I had it hooked to the board5:
 front of the Svalboard mainboard, with
 3V3 hook-up
 back of the Svalboard mainboard, with
 GND and GPIO16 hook-up
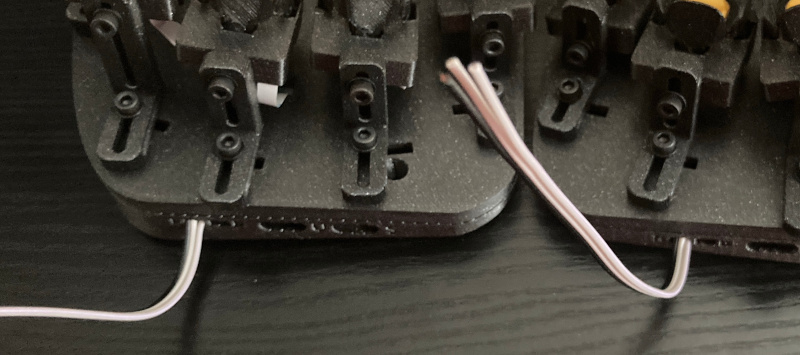
 exit wound – I repurposed the usb boot hole on the back
I repurposed the USB boot hole on the back, because I use the switches on the bottom. Plus, as I’ve learned, if you want to put the board to bootloader, you can simply tap the reset button twice6.
With that and some sticky tape, a prototype hw is done:
 double sided tape is my friend here
Obviously, it’ll need a diffuser, box, and maybe some firmware.
Firmware
The firmware part was surprisingly easy – most of the stuff is a question of a few lines of C, thanks to QMK Firmware having all kinds of wheels already built-in.
One of them being support of layer lighting of the rgblight feature.
Nice and sweet:
diff --git a/keyboards/svalboard/config.h b/keyboards/svalboard/config.h
index 704177adc6..2843cc6e7e 100644
--- a/keyboards/svalboard/config.h
+++ b/keyboards/svalboard/config.h
@@ -62,3 +62,17 @@ along with this program.  If not, see <http://www.gnu.org/licenses/>.
 // hub, KVM, or a machine that boots slowly (ECC RAM), the keyboard no longer
 // needs to be reset to come to life.
 #define SPLIT_WATCHDOG_ENABLE
+
+// pretty lights
+// https://docs.qmk.fm/#/feature_rgblight?id=configuration
+#define WS2812_DI_PIN GP16
+#define RGBLED_NUM 2
+#define RGBLED_SPLIT { 1, 1 }
+#define RGBLIGHT_LAYERS DYNAMIC_KEYMAP_LAYER_COUNT
+#define RGBLIGHT_DEFAULT_SAT 0 // white?
+#define RGBLIGHT_LIMIT_VAL 130
+#define RGBLIGHT_DEFAULT_VAL 20
+#define RGBLIGHT_LAYERS_RETAIN_VAL // remember val across restarts
+#define RGBLIGHT_SLEEP // don't annoy when host asleep
+#define RGBLIGHT_MAX_LAYERS DYNAMIC_KEYMAP_LAYER_COUNT
+#define RGBLIGHT_VAL_STEP 10
diff --git a/keyboards/svalboard/info.json b/keyboards/svalboard/info.json
index 25b3c5cdba..ecee25dbd7 100644
--- a/keyboards/svalboard/info.json
+++ b/keyboards/svalboard/info.json
@@ -17,7 +17,7 @@
       "midi": false,
       "mousekey": true,
       "nkro": true,
-      "rgblight": false,
+      "rgblight": true,
       "sleep_led": false,
       "unicode": false
   },
@@ -109,4 +109,4 @@
           ]
       }
   }
-}
\ No newline at end of file
+}
diff --git a/keyboards/svalboard/keymaps/vial/keymap.c b/keyboards/svalboard/keymaps/vial/keymap.c
index 193804e21a..721302ddca 100644
--- a/keyboards/svalboard/keymaps/vial/keymap.c
+++ b/keyboards/svalboard/keymaps/vial/keymap.c
@@ -19,12 +19,57 @@ along with this program.  If not, see <http://www.gnu.org/licenses/>.
 #include <stdbool.h>
 #include <stdint.h>

+#ifdef RGBLIGHT_ENABLE
+#define LC(name, color) const rgblight_segment_t PROGMEM (name)[] = RGBLIGHT_LAYER_SEGMENTS({0, 2, color})
+LC(layer0_colors, HSV_CHARTREUSE); // NORMAL
+LC(layer1_colors, HSV_CHARTREUSE); // NORMAL_HOLD
+LC(layer2_colors, HSV_GOLD); // FUNC
+LC(layer3_colors, HSV_GOLD); // FUNC_HOLD
+LC(layer4_colors, HSV_AZURE); // NAS
+LC(layer5_colors, HSV_AZURE); // would be NAS hold
+LC(layer6_colors, HSV_RED); // maybe 10kp
+LC(layer7_colors, HSV_ORANGE);
+LC(layer8_colors, HSV_PINK);
+LC(layer9_colors, HSV_PURPLE);
+LC(layer10_colors, HSV_MAGENTA);
+LC(layer11_colors, HSV_SPRINGGREEN);
+LC(layer12_colors, HSV_TEAL);
+LC(layer13_colors, HSV_TURQUOISE);
+LC(layer14_colors, HSV_YELLOW);
+LC(layer15_colors, HSV_CORAL); // MBO
+#undef LC
+
+const rgblight_segment_t* const PROGMEM sval_rgb_layers[] = RGBLIGHT_LAYERS_LIST(
+    layer0_colors, layer1_colors, layer2_colors, layer3_colors,
+    layer4_colors, layer5_colors, layer6_colors, layer7_colors,
+    layer8_colors, layer9_colors, layer10_colors, layer11_colors,
+    layer12_colors, layer13_colors, layer14_colors, layer15_colors
+);
+
+layer_state_t default_layer_state_set_user(layer_state_t state) {
+  rgblight_set_layer_state(0, layer_state_cmp(state, 0));
+  return state;
+}
+
+layer_state_t layer_state_set_user(layer_state_t state) {
+  for (int i = 0; i < RGBLIGHT_LAYERS; ++i) {
+      rgblight_set_layer_state(i, layer_state_cmp(state, i));
+  }
+  return state;
+}
+
+#endif
+
 void keyboard_post_init_user(void) {
   // Customise these values if you need to debug the matrix
   //debug_enable=true;
   debug_matrix=true;
   //debug_keyboard=true;
   //debug_mouse=true;
+
+#ifdef RGBLIGHT_ENABLE
+  rgblight_layers = sval_rgb_layers;
+#endif
 }

 // in keymap.c:
@@ -277,4 +322,4 @@ void mouse_mode(bool on) {
   }
 }

-#endif // defined MH_AUTO_BUTTONS && defined PS2_MOUSE_ENABLE && #defined MOUSEKEY_ENABLE
\ No newline at end of file
+#endif // defined MH_AUTO_BUTTONS && defined PS2_MOUSE_ENABLE && #defined MOUSEKEY_ENABLE
diff --git a/keyboards/svalboard/rules.mk b/keyboards/svalboard/rules.mk
index 67794b98b6..2cd2244612 100644
--- a/keyboards/svalboard/rules.mk
+++ b/keyboards/svalboard/rules.mk
@@ -39,4 +39,6 @@ ifeq ($(strip $(MH_AUTO_BUTTONS)), yes)
 endif


-
+# we want some pretty lights
+RGBLIGHT_DRIVER = ws2812
+WS2812_DRIVER   = vendor
The bare diff is yours for the clicking; so is the pygmentized version, if you’re so inclined7.
Which leaves the last part, diffuser and a box…
Diffuser and a box
With the box I played a bit in Fusion, and came up with this two-part solution:
The f3d design file can also be yours for the little price of free, under CC – BY NC SA license8.
Printed it with normal 0.4 nozzle and default profile. The diffuser is simply a small piece of regular paper tucked inside. And attachment is the king of DIY, double-sided tape.
End result
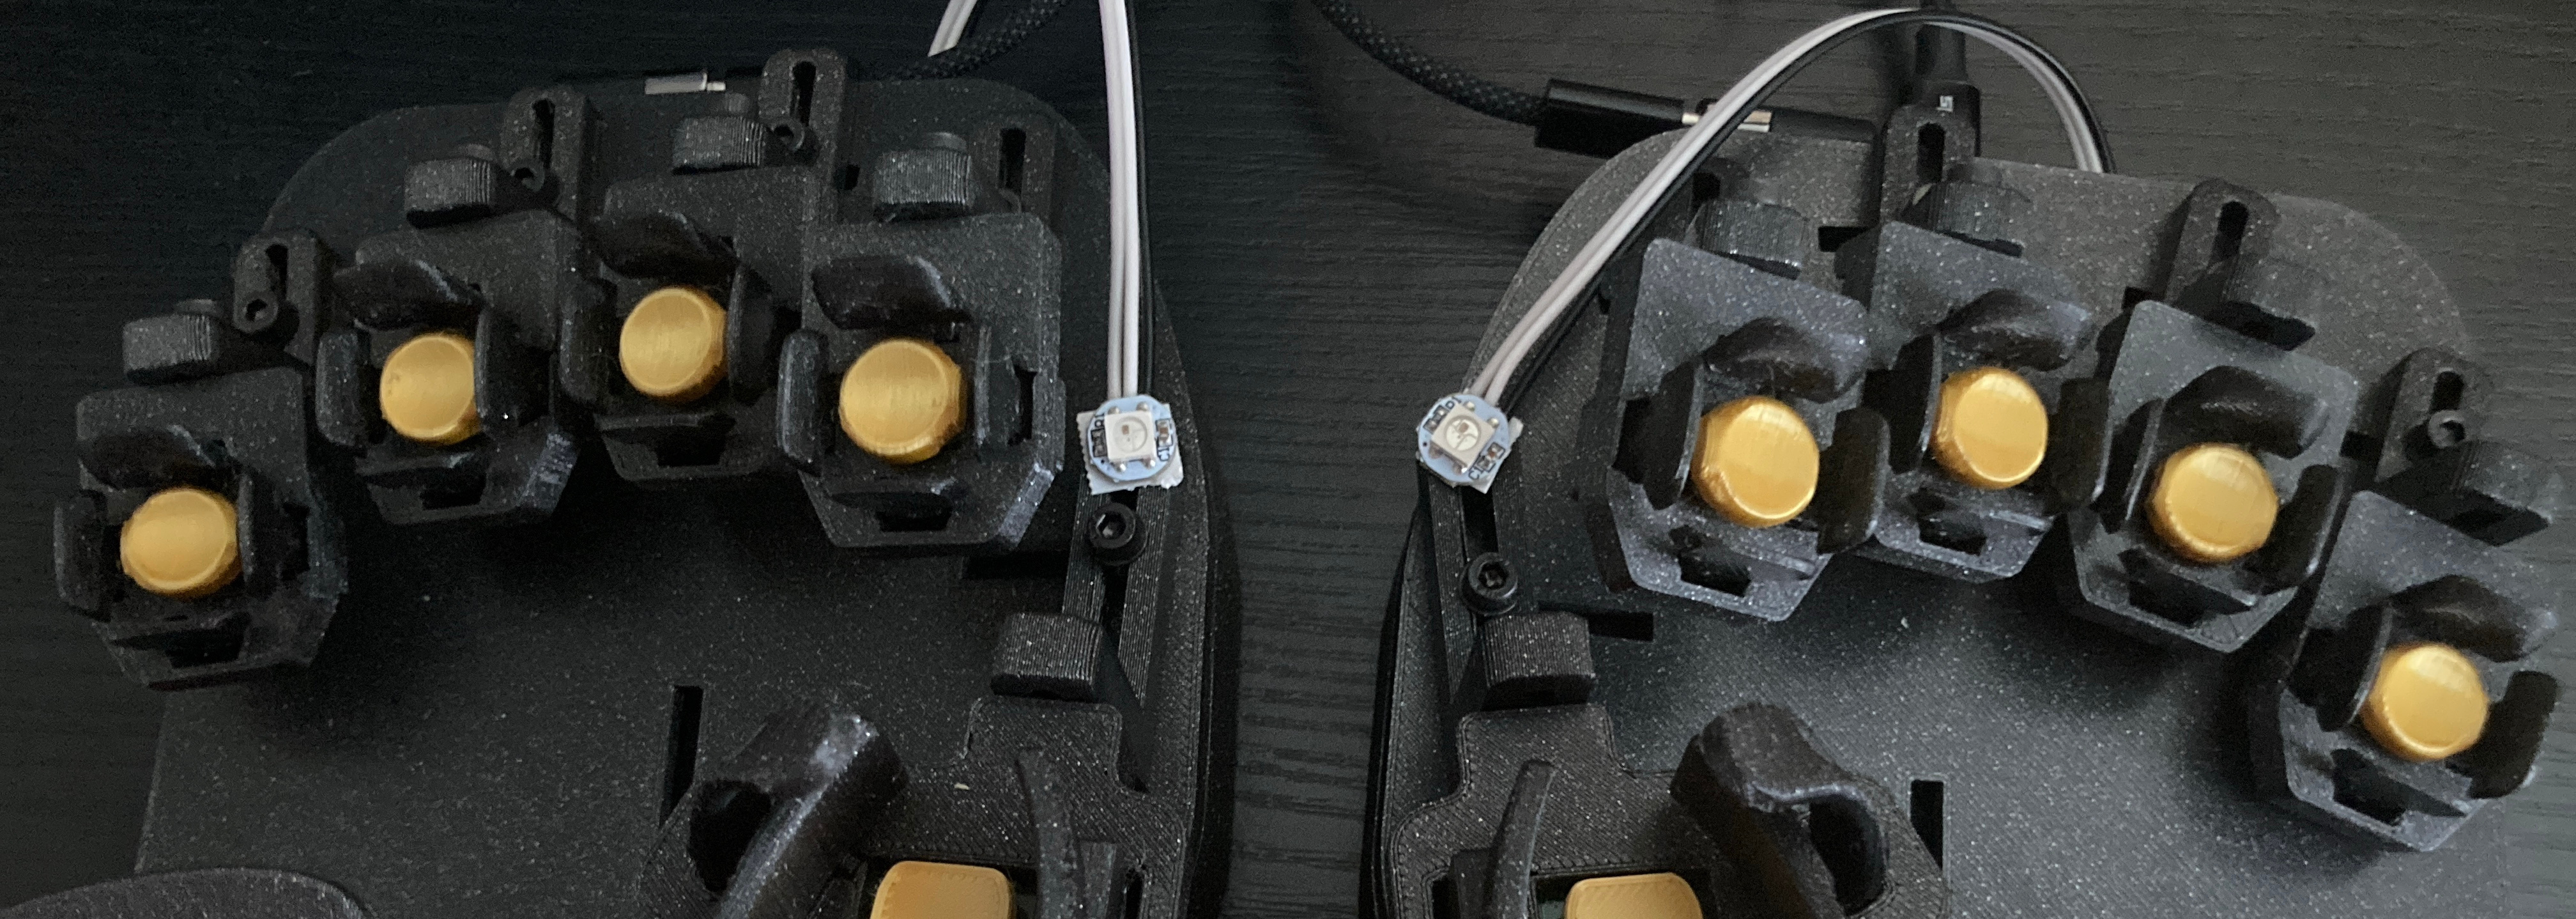
Check this out:
It turned out reasonably well, right?
I think that the box could be tweaked a little further, because the clearance between the rim on the top part and the board was only guesstimated.
As a result, I cut out part of the rim. Which then means that the light leaks through a bit on the side.
Plus, the viewing angle is also not 100%. I might need to revisit that later.
For now, I call it “gemacht”.
-
Svalboard’s fearless creator, Morgan Venable, a.k.a.
@_claussenon Discord. ↩ -
He is super responsive (on Discord). The fact Svalboard is still in a beta-ish phase probably helps too. ;-) ↩
-
Round numbers and all that. Also, proximity to
GND. ↩ -
Which you can often also replace with
3V3(since the DS linked above says thatVDDis+3.5..+5.3 V… and what is 10% between friends, eh?) ↩ -
To be fair, originally I was pulling the
3V3out of the back side, too, but then the board doesn’t fit back in the case. ↩ -
Courtesy of QMK’s
RP2040_BOOTLOADER_DOUBLE_TAP_RESET. ↩ -
Note to myself, the
diffrender inlined in the post is terrible. ↩ -
The non-commercial bit because I don’t want to get into hot water with Autodesk since my license is the free hobbyist one. Also, how the hell would one commercialize this basic sketch-extrude-chamfer? :) ↩